
Thank you for following my kitchen update journey. Full disclosure I began this project before Thanksgiving but didn't finish it until two weeks before Christmas. I'm not sure why I take on big projects like this during the holidays. My intentions are always good but here it is in the new year and I'm just now blogging about it. Sorry for the delay, friends. Sometimes life just gets in the way or I take on more projects before blogging the last one. I did promise you the details, so here it goes. I've already shared with you how to remove the backsplash. If you've missed it please head on over to this post. How To Remove A Kitchen Backsplash

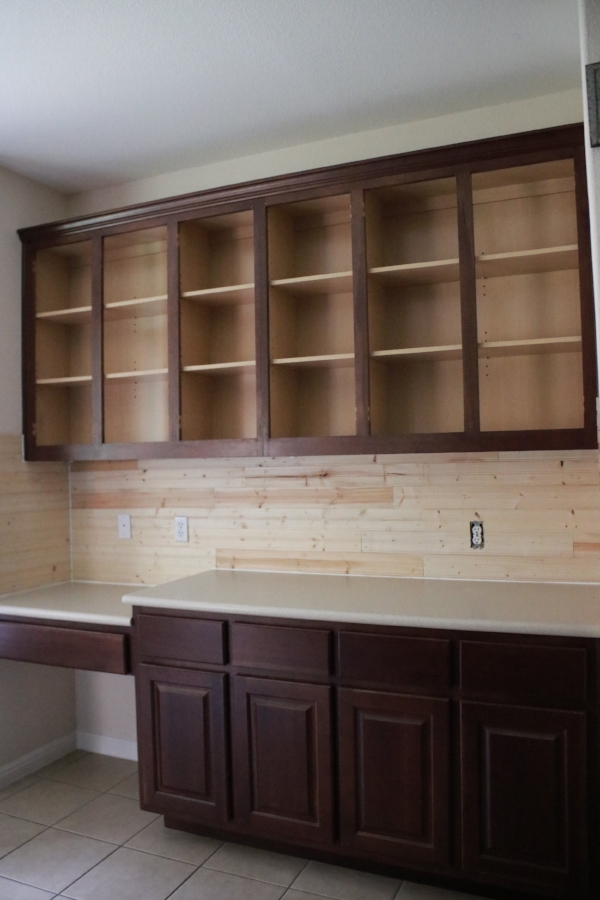
When I was removing the tile I encountered lots of damage to the drywall. Because of this I had to come up with a solution that didn't require time to repair. Hey, I'm all up for a challenge, but honestly right before Christmas decorating, saving time was a must.
A few months back I made some changes to my kitchen's bar by using wainscot. Yep no post on that one yet. Will let you know when I get to it. Sometimes the ADD kicks in and I see squirrels.
After finishing the kitchen bar I started to think about how I could incorporate the same look somewhere else in the kitchen to tie it all together. So the backsplash in the breakfast room was a good choice since it wouldn't come into contact with water and its in the same area as the kitchen bar. This is what I'm talking about friends, bringing it all together.

I used this Reversible Wainscot from Lowes. They had longer boards but I felt the shorter would be best so I didn't have to cut as much.
I chose to use the side that had smaller looking planks since this is what I did on the bar.

I used a circular saw to cut the boards

Friends, this project had many firsts for me and it so had me out of my comfort zone. I've had a major fear of cutting power tools but I'm happy to report, this project I did everything on my own. Hubby taught me how to use the circular arm saw which I'm so thankful. Because now I feel like I can tackle many more projects. Watch out friends more projects coming your way.
I put together a speed video to show you the process I went through to complete the project. You can view it below.

Now that the wainscot is up, the next step was to fill nail holes and caulk it. This is my least favorite thing to do. If you've ever caulked before it can really hurt your hand. As a women I think those dispensers are meant for men, because gripping it can be very difficult for a woman. I need to invent tools that women can use some day.
Almost done, next was to paint the backsplash. When painting, I first used BEHR's all in one primer and seal. You'll need to use a primer for this wood before putting a coat of paint on it. Afterwards I finished it up with 2 coats of BEHR's paint and primer in one, with no tint.

That's it ya'll, the backsplash tile got removed and in its place painted wainscot went in. This solution looks just as good or even better than tile. It's timeless and much easier to put up then tile and grout. I think it is, I haven't put tile in before but I bet it's safe to say it is. Although tileing is on my list to tackle some day. I promise to blog it when I do.
Thanks again friends for following me for this project. Please feel free to comment below if you have questions.
Next up is Painting cabinets and what I use to do that. I'll also discuss the reason I chose to use what I did.
See you next time!
Helping you make your home welcoming,
